The page settings dialog is used to customize various page-related items unique to each template. It is grouped into several sections, as described below.
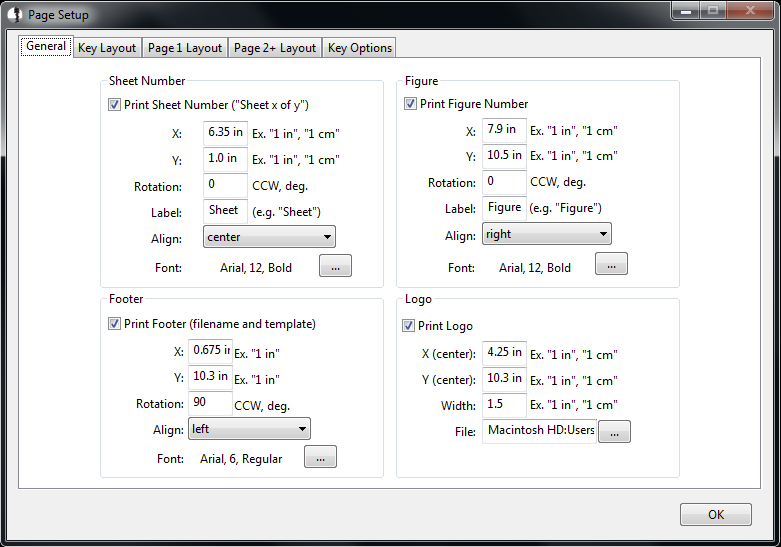
The "General" tab is used for the four items that get printed on every page:
The sheet number, figure, and footer are all defined similarly: enter an x- and y-coordinate (including units, e.g. "1 in"), a rotation angle, the text alignment, and the font information. Additionally, the Sheet Number and Figure require a label to be defined. The default values are "Sheet" (so the text will be printed "Sheet 1 of 2") and "Figure" (the text will print "Figure A-2").
The footer is automatically generated, and consists of the filename followed by the template used to print. The template is enclosed in square brackets, "[" and "]".
The logo needs x- and y-coordinates of the center of the image, and the desired printed width. BorinGS will automatically scale the image up or down to fit that width. To select a file, click the "..." button.
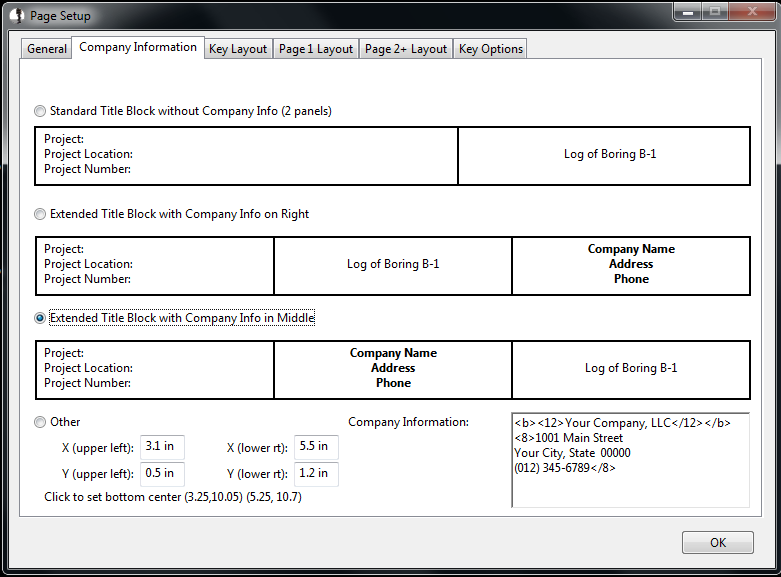
You can incorporate your company's logo in the General tab, but if you would prefer to put your company's name and address on the log, do this through the "Company Information" tab. You can have BorinGS put your company information in either the middle or right panel of the title block (this will add a third panel), or you can place the company block anywhere on the page (it is recommended that you put it at the bottom center).
If you choose to place the company information at the bottom center, you must manually place it. If you would like to try the default values, click the text below the "X" and "Y" input boxes.
Enter the company information in the text area near the lower right of the screen. Note that the text here can take advantage of the markup tags used elsewhere in the program. For example, to make your company name bold (using <b></b> tags) and 12 point font (using <12></12> tags), enter the following:
<b><12>Your Company, LLC</12></b>
You should manually insert line breaks between lines. Note that tags can span across lines, so if you want all of your text to be bold, do not use the "</b>" tag until after your final line.
All new templates will have default values for company information using a 12 point bold font for the company name, and an 8 point font for all other information:
<b><12>Your
Company, LLC</12></b>
<8>1001 Main Street
Your City, State 00000
(012) 345-6789</8>
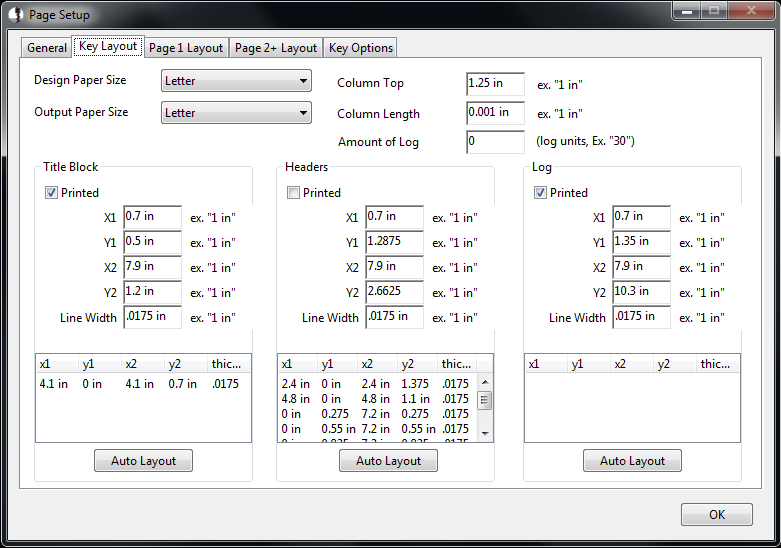
The log can be thought of as 3 main page types as far as the page layout is concerned:
The settings on these three tabs are the same.
All of the coordinates input in the page settings dialog are based on the "Design Paper Size." For "Letter," the width is 8.5 inches and the height is 11 inches. Landscape pages are denoted with a capital "R" at the end of the size ("LetterR" is landscape "Letter").
After designing the page based on the design size, you can choose to print the page using a different size, letting the software scale the appropriate sections. If you design the pages based on "Letter," you can then easily print to "Ledger" by changing the "Output Paper Size" to "Ledger." Each page type can be set differently (size and rotation).
The "Column Top" defines the distance from the top of the Log Section (see below) to the top of the data area of the column. Any column titles will be printed in the space between the top of the log section and the column top. In the image above, this space is set to 1.25 inches.
The "Column Length" defines how long the column will be on the page. For the key, the column length should be set to a tiny amount (as shown above). Page 1 has a default value of 6 inches, and Page 2+ has a default of 7 inches.
These are the three main sections available on each page, although not all pages require each. The title block contains the project information, along with the borehole name. The headers contain information about the log itself, including date(s) drilled, drilling method, etc. Finally, the log section contains the log itself.
Each section is set up the same way, entering the upper left coordinates (x1, y1) and the lower right coordinates (x2, y2). Note that "0,0" is the upper left of the page itself, and it is up to you to add the desired margins.
You can also set the line width and default font size for each
section separately.
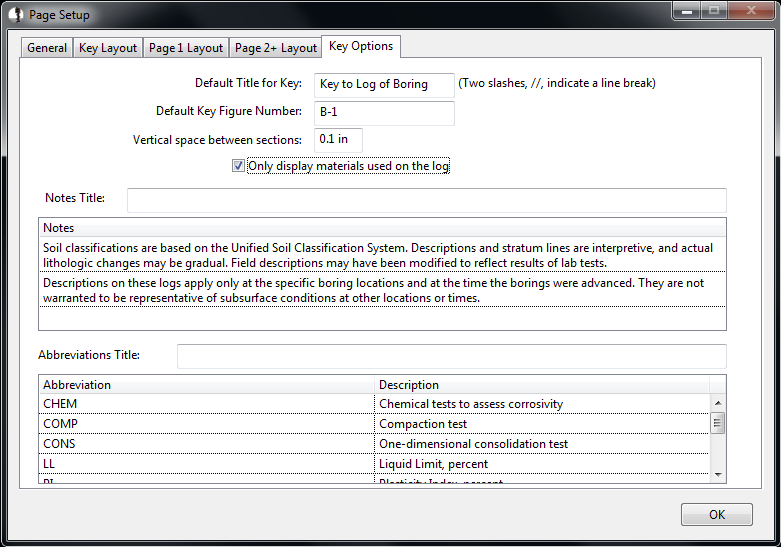
Various text printed on the key can be
adjusted on the "Key Options" tab. The default values are
typically appropriate, but to change items such as the general notes,
enter the desired changes in the spreadsheet shown.